firstly, I started off by using clay to make a mould for a creature mask to then put latex on top of. After I left it to dry it all cracked and I decided I wasn't too keen on the idea anyway. Here are a couple of pictures of the clay mould.

To create these grooves I used clay equipment and dug it into the clay and pulled chunks of the clay out in places. This was the best part of the mask as the rest was boring.

I did the eyes this shape as if they were aliens I left the holes as I was going to attatch material or plastic over the top and paint eyes on.

As the first mask didn't turn out too well I decided to create another, again by sculpting with clay I really like this one compared tot he last one. All the risen bit point to specific elements on the face like the eyes and nose. I did this to draw attention to these parts.

mouth section close up.


I was trying to create a creature that had wire coming from each section of clay of the face and after casting it I could make the spaces in between the wire a stretchy but slimy material.

I went on to mod rock this mask as I felt it was stronger material to hold the wire.

I built up some areas using modrock as the lines didn't stand out much.

whilst waiting for the masks to dry I went on to creating a body for my creature using a mannequin I attached some material to it using designs from my sketchbook. I wanted to create the middle section as a mermaid so I used a skin colour material and pinned it under the boobs. I did this as I thought I could attach or cast two shells as a bra. I then looked back at my designs and mixed them all together and that's when I came up with the head piece. I liked it to begin with but then it looked a little weird so I removed it from the mannequin.

I took the face cast home and started to paint it pinks and purples. at this point I came to the idea I wanted it to be some sort of weird mermaid and I added extra eyes. I used acrylic paints and glitters to decorate the mask.

here is a better view of the eyes.

This is the mask close to being complete all that is left to do is the eyes. I feel that some of the eyes need building up and making 3d instead of them being just paint.

The other mask I created I thought would look good blues and greens. so again using acrylic paints I painted the mask using darker shades on the risen bits.

after creating the first mask I though it looked a little empty around the edges so again looking at my designs in my sketch book and thought I could add some fins. I started by creating the fins using a thick wire and to stable it using a thinner wire.


I used the same technique for the machete fin for the bottom of the tale I did a machete to see what materials would work best on a bigger scale.

I then added tissue paper and applied it with glue and water like paper mashe

I also did a bigger scale one but designed differently.

whilst in the process of testing things out and experimenting I decided to do an arm cast. to see what would work best to create webbed hands. I wrapped my arm in cling film and got a friend to cast it using mod rock.

Back to the mannequin whilst the cast was drying I had took of the head piece and cut down the material down to the body section.

moving on to the tale of my creature.
I laid a piece of calico on the floor. I folded it over so it was doubled up and drew on it so it was thick at the top and went into a point towards the bottom. I then sewn down the line I drew and turned it inside out making a pouch. i then stuffed the tail using wadding to bulk it out.

I felt that because the tail was so bulky it wouldn't bend and I wanted my creature to be sat on a rock so I added some strips of wire inside so it would bend better and I could position it on the rock.

I positioned the tail to how I would like it to sit on the rock but here on a chair. it sat quiet well with wire inside so I sat a mannequin inside it as I didn't like the material piece I had done previously.

this is a better picture of the tail.

I felt that it would take time to create scales onto fabric. So I rolled out some chicken wire and placed the tail onto it then I cut it down to the size of the tail and wrapped the chicken wire around it. I did this as I felt that the chicken wire had a better effect for scales than the material did. Also I
seen this sheep made out of wire at Yorkshire sculpture park and thought it would work well.


I think it looks like a snake when it sheds its skin.

After creating another tail using chicken wire I then went on to experimenting how I could create different effects for scales. I put a glove through the inside of the netted tail and the fingers dangled. I didn't quiet like this effect as I think it lost the technique of using the chicken wire.

I also blew the glove up to see if it created a different effect but still I didn't like it.


going back to my bulky soft tail whilst thinking what I could use for my wired one I decided it needed a fin at the bottom so using wire i pierced some wire and bent it to secure it. and made a fin. Using thinner wire again I attached it from the bottom to the top to make it stronger and section it off.

I did samples of how I could create scales on the tail. But as I was trying to manage my time effectively I decided that spray paint was quick and also looked very effective. I used a little piece of chicken wire and held it over the material whilst spraying it to create a scale like effect. I chose these two colours as these are the colours I painted the mask.

this is a close up of the scale effect made by using chicken wire the purple showed more effectively than the pink.

my arm cast was set, but I didn't want it to be an ordinary hand so I removed a finger and moved the thumb further round to spectate the fingers for the web.

back to the fins on the mask I tried to heat manipulate a rubber glove over the wire frame I had made but it just burnt and smelt.

so I decided to use pink bin bags, I feel this worked effectively and looked really good as it melted really well and also it put holes in places so the wire underneath was visible. I think this finished the mask off.

After I did a body cast with mod rock I then went on to painting it skin colour and showing where the rib cage is.

I felt it looked odd next to the tail as it was skin colour and the tail was pink and purple so I did the same effect as the tail using spray paint but on the body cast.


After spraying th body i then placed it inside the tail to see if it would fit.

It fit quiet well but I needed to get rid of the wire band at the top of the tail for it to be a better fit.


I moved on to creating the bottom fin I did this the same way as I did the fins on the face by heat manipulating pink plastic bags in the outer section. As I felt it worked really good before.

To add a different colour I used the same technique but with white bin bags as I didn't want it to all look two colours and blend in.

I placed a lighter pink tissue paper over the frame to see if it would work well before attaching it and after speaking to my friends they said it looked good so I then glue gunned the lighter pink tissue paper to the frame to complete my fin.

this is my fin finished. I had to use white to break up the pink as it would look too pink. I feel tissue paper worked quiet well as I wanted it to be related to pollution and all the paper ripped.

after doing the fin I had to figure a way out to attach the body to the tail I fount this hard as the body was thin and the tail was quiet big at the top and also had a wire band around it. I had to cut the wire band out for the material to fit to the body shape then I went on to glue gun then material to the mod rock body as nothing else would have worked. I had to pad out the back so she had some form of a bum as it was just flat.

this is the mermaid, creature so far with the fin finished and the body finally attached to the tail.


I was worried about the end of the tail ripping straight through the fin so I attached it to the tissue paper.

my creature had no arms and I was running out of time. I didn't want to make her arms out of mod rock like the body as I felt it would look too much like a mermaid. so I went on to looking i8nt what I could use instead of mod rock and I thought I could use a pair of tights and attach them inside and stuff them with wadding to create arms like an octopus with suckers.

This is the outcome of the tights padded out with wadding I think it looks better than it would with just two ordinary human arm's. It gives it more depth and doesn't just look like a mermaid. the only thing I could of changed or altered was to use two pairs of tights on each arm to create 8 arms and not 4 all together or double the tights up as they look white and I wanted them to look skin colour.

I also attached some scales. I used tissue paper and also a pink rubber glove and cut the shape out of the scales on the tail and attached them loosely with the glue gun as I wanted to create a polluted creature.


Here is the mask placed on a balloon to see if the colour of the mask looked okay on the rest of the body. I felt that the colour pink was too dark and need to be lightened as it was too dark also I needed to figure out how to attach the head to the body.

Where the body was attached to the tail it looked like it was just stuck on and looked a mess so to cover it I went to the seaside with Emma and collected some shells to attach to her.


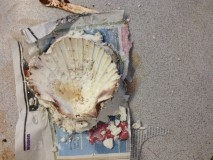
Also during my FMP I went on holiday and collected this shell as I knew I needed something as a bra. I thought if I could get a big enough shell I could cast it and create two shells for its breasts.

Firstly, I used clay and placed the shell within it but as the shell was flimsy and thin I thought to build the clay up to the shell so it wouldn't break the shell by pushing it through the tough clay.

This is how it turned out after pushing the clay up to the shell. I knew at this point by looking at the clay it wouldn't work out but its all experiments so I poured in the one cast plaster and waited to see the outcome.


As I thought it wouldn't turn out well it didn't, although it didn't turn out very well I still liked the effect of it.

But whilst I still had some plaster left I tried the cast in sand. I made two blocks of sand but added a little water so that it would mould instead of falling apart then I placed my shell into the sand and pushed it down trying to get all the grooves of the shell into the dap sand. I then removed the shell and poured in the one coat plaster.

This Was the outcome of the sand cast and I really liked it as I got all the groves in it that I wanted and I also liked the effect of the san on the plaster rather than just a shell. I had to go around and take away all the excess plaster to get the overall shape of the shell.

I Had a little bit of plaster left so one of my friends said to put the plaster in a block on some newspaper so it didn't stick to the table and place the shell inside it to see it that casted well.
This was the outcome of placing the shell in the plaster. I liked it but t wasn't as strong as the sand one.


I tried it again and it went terribly wrong.

After finishing the shells I then moved on to creating a fishing net, instead of buying one I learnt how to arm knit and created a small net.

I got an old bikini and attached tissue paper to it, pink as I was sticking to the colours pink and purple.

After I then glue gunned the small fishing net to it and added a shell towards the middle. I felt that the shell in the middle brought it together.


I created this as I thought I could have different accessories on a table at the side of the creature to show that I had tied out different techniques for her clothing and that I could change her bra. I went on and added some smaller shells the bra as the tissue paper was more visible in some areas than others.

Here I have started to add shells to the body to disguise where the material tail is glued to the mod rock body. I feel this worked really well as it blended in quiet well and also it worked well with the shell cast on the breasts.

This picture below shows the shell casts on the breasts and how it works well with the shells on the body.


I attached the shells on the hips using the glue gun but as the two big shells are made of plaster the glue gun wouldn't work to stick the plaster casts to the mod rock so I used one cast plaster to attach them.

I started to do some more arm knitting to create some fishing nets for behind my mermaid as I decided I didn't want her sat on a rock anymore I wanted her hanging so I thought it would look good and fill in the space behind her with fishing nets.


Putting the mermaid up I used fishing wire to hold her up under the body and instead of having to paint the backgrounds I went and bought three shower curtains, I got two spotty ones and also a plain green one. I think it worked quiet well as it gives it a background but the fishing net pulls you're eye away from them being curtains.

As I only did a mask for the front of the face I used my hair extensions as the hair as they are purple and work quiet well. Also it covered to back of the head. I also lightened the pink on the mask as it was too dark and painted the body skin colour again because when I attached the shells to the breasts I got plaster on the body, I added a little pink to the top of the body and the neck so it blended the mask in to the body.

Whilst she was hung up I attached bottle tops to her arms as they looked too plain and painted over them a little as they just looked placed.
